The final part. This covers 50 seconds to the end, about two weeks of the run.
The shape of the eight weeks, for anyone planning their own: weeks 1–6 learning the steps, weeks 7–8 on detail and turn variations.
1. Plié into passé — shifting the axis

How long are you going to keep sending me backwards?
- Point through the end of the passé foot. Edge, not a rounded shape.
- Open the arms as generously as the leg. Same timing as the passé — and the timing is everything.
- Shake out the shoulders. Opening the arms isn’t enough if the shoulders come with them.
2. Frappé and jump

Jumping off one foot, shifting the axis, and plié deeply.
- Keep the torso upright. The arms change direction; the axis of the torso does not collapse. Ever.
- A definite point. This step only comes alive when the foot points. Extend it with force.
3. En dehors turn

Turns really are the most thrilling part. I don’t make the rules.
- Use the elbows. Open them wider to the side and hold the arms firmly.
- Fix the gaze. Even mid-turn, plant your eyes on one point and leave them there properly.
4. Piqué turns into chaînés

There are two versions of this section. My teacher switched me to the easier one.
Thank you.
The sequence: piqué chaîné, piqué chaîné, chaîné chaîné, piqué chaîné — twice.
- Divide the space cleverly, as though you had a full stage.
- Hold a beautiful en haut. More strength in the arms.
5. Dégagé with tulle arms

If you’re going to do it like that, honestly, don’t.
- Keep the grace to the last moment. (I lose it daily.)
- Deeper plié for rebound — press further down and let the elasticity carry you up.
- Delicate fingertips. Round, soft, finished.
What I need to work on: plié
Here’s the part that changed something for me.
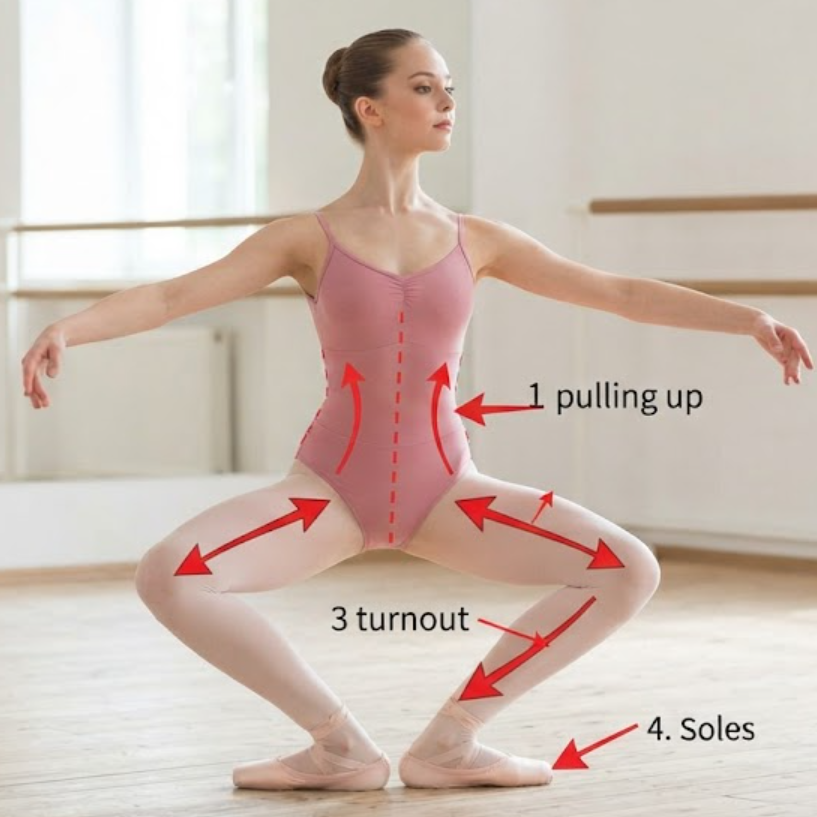
I’ve been corrected on plié for years. I knew it was shallow. I did not know which muscles were supposed to be doing it.
Then I went to a movement and health centre and found out: I’d been gripping hard in my calves and ankles. All that tension meant the muscle couldn’t lengthen. I was fighting my own plié.
So I wrote down what should actually be working.
The muscles a plié uses
- Core — abdominals and erector spinae
- Inner thigh — adductors
- Glutes
- Calves — gastrocnemius and soleus
- The feet
How to plié properly, step by step
1. Set up First or fifth position. Lengthen the torso upwards and engage the core.
2. Going down Keep the pelvis and hips in one line — don’t let the seat drift backwards. Knees track over the toes. Never let them fall inwards.
Demi-plié: down until the knees are directly above the ankles. Heels stay on the floor.
Grand plié: down until the thighs are close to parallel with the floor. In first position, the heels naturally lift a little at the bottom.
3. Coming up The reverse of the way down. Squeeze the core, inner thighs and glutes strongly and extend the legs with power. Torso long, heels down.
That’s La Fille du Pharaon. Eight weeks, ninety seconds, one borrowed tutu, and a plié I’m still working on.
If you’re about to start your first repertoire class — film yourself. It’s mortifying and it’s the fastest thing you can do.
Leave a Reply